NAILCASA · SHORT NAIL GUIDES
Micro French Manicure on Short Natural Nails: Ideas and a Beginner Guide
Choose a delicate tip, keep your natural length, and learn how to make a small design feel intentional.
A micro French manicure on short natural nails pairs a clear-looking, sheer or nude base with a very thin line of color along the tip. The goal is to leave most of the nail visible. White is a familiar choice, but burgundy, chocolate brown, pale blue and a small metallic accent can create different versions of the same design.
You do not need long extensions to explore the look. What matters is having enough visible surface to place the line neatly, choosing a base you like on your own nails, and keeping the tip in proportion. If the free edge is almost absent, you may prefer a subtle curved accent rather than trying to copy a long-nail reference exactly.
This guide explains how to plan the shape, offers six color ideas, and walks through a beginner approach with ordinary air-drying polish. It also covers common problems, including uneven tips and lines that become thicker every time you try to correct them.
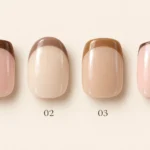
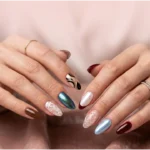
Image note: The two boards are original AI-created design concepts, not photographs of tested manicures. The samples illustrate color and placement. Adapt the proportions to your real nail shape and discuss any salon version with your nail artist.
What Makes a French Manicure “Micro”?
The difference is the visual weight of the tip. A traditional French design usually gives the contrasting edge a more noticeable band. A micro French keeps that band fine, with the base color occupying almost all of the nail. The line still follows the tip; it simply becomes a smaller accent.
Essie’s French manicure guide describes the micro version as a particularly thin tip with a gentle curve at the edges. There is no need to turn that idea into a rigid measurement for every finger. Your thumbnail and little fingernail have different widths, so judge the balance on each one.
For this tutorial, use “a slim line that leaves plenty of base visible” as your working description. A line can be delicate without being so faint that you cannot see it. If white creates more contrast than you want, change the color before making the band progressively wider.
Choose the Shape and Base Before Painting
Start with the short shape your nails can comfortably support. Trying to file a very short nail into a narrow almond shape may leave you with little space for the design you intended. Square, softly rounded square, squoval and short oval shapes all offer useful starting points.
| Nail shape | Tip to try | What to avoid |
|---|---|---|
| Short square | A fine, nearly level center with gently curved corners | A heavy rectangular bar that takes over the nail |
| Squoval | A shallow curve that follows the softened edge | Sharp corners that do not match the filed shape |
| Short oval | A continuous narrow arc around the rounded tip | A flat stripe that ignores the curve |
| Uneven free edges | Fine bands adjusted for a similar overall appearance | Copying exactly the same band depth onto every nail |
Next, choose how much of your natural nail you want to show. A sheer base allows the nail’s own color and free edge to remain visible. A more opaque nude base gives greater coverage but changes the airy appearance. Neither is automatically better; the choice depends on the effect you want.
Try the base shade on one nail before doing both hands. A pink that looks neutral in its bottle may appear brighter on your nail, while a beige may look warmer than expected. Check it in the lighting where you will usually see your hands, then decide whether the tip should contrast strongly or blend softly.
Six Micro French Nail Ideas for Short Lengths

1. Sheer Pink with a White Micro Tip
This version keeps the familiar French combination while reducing the size of the white edge. A sheer pink base gives the white line a clear background. Keep the tip narrow enough that the first thing you notice is a neat nail with a small accent, rather than a large block of white.
It works as a starting point for short square or squoval nails. If the white feels too bright, try the ivory version below instead of adding more pink layers to disguise it. At a salon, request “a sheer pink base with a very fine white tip and no added length.”
2. Nude with an Ivory Edge
Ivory creates a softer contrast than a bright white against many nude bases. The design suits someone who likes the shape of a French manicure but wants the line to look less graphic. Compare the ivory and base together first; two very similar shades can make the edge difficult to see.
On a short oval nail, let the line follow the rounded outline. Keep the corners as delicate as the middle. Ask for “a nude base with a slim cream-colored tip, avoiding a thick white band.” The exact warmth of the colors can be adjusted to your preference.
3. Burgundy Micro French Tips
A burgundy edge adds a darker outline while leaving most of the nail light. It is a useful way to wear wine tones when you do not want an all-over dark manicure. Because the contrast is stronger, small changes in the line’s thickness can be especially noticeable.
Begin with a thin line and inspect it before adding more polish. On a short squoval nail, a shallow curve keeps the effect contained. For an appointment, request “a sheer neutral base and a fine burgundy tip, with the color confined to the edge.”

4. Chocolate Brown on a Sheer Base
A chocolate tip creates a warm, defined edge. Pair it with a sheer pink or beige base and keep the rest of the manicure simple. There is already enough contrast between the brown and the background to make the fine line visible without adding a second outline.
Choose the brown from a swatch rather than its name alone. Espresso and milk-chocolate shades give different results, especially indoors. Ask for “a short micro French with a thin chocolate-brown tip and a sheer base,” and clarify whether you prefer a red-brown or a more neutral brown.
5. Powder Blue Micro Tips
A pale blue line introduces color without covering the whole nail. The effect can be gentle against a nude base or more noticeable against a pink one. Keep the blue consistent across the hand, and avoid adding several extra motifs if you want the manicure to remain minimal.
Some pale polishes need more than one pass for an even appearance. Build the color within the same narrow boundary rather than widening the line with each layer. At a salon, request “a sheer base with a slim powder-blue edge, following the shape of my natural nails.”
6. A Fine Gold Edge
A small metallic line adds a reflective detail that changes with the light. For a straightforward home interpretation, choose an appropriate metallic nail polish. A painted metallic tip, foil edge and chrome effect are different finishes, so do not expect every product to match the concept board exactly.
Keep the gold narrow and skip extra glitter if the edge is meant to be the focal point. Ask your nail artist which method suits the finish you want, then confirm the service before starting. A useful brief is “a delicate gold micro tip on a nude base, kept flat and short.”
What You Need for the Regular-Polish Version
- A nail file suitable for your usual shaping routine
- Your chosen base coat and sheer or nude polish
- A contrasting nail polish for the tip
- A fine nail-art liner brush, if the polish brush is too broad
- A clean disposable palette or practice surface
- A compatible top coat and polish remover
- A steady table, good light and something to protect the work surface
You can practice the brush movement before painting a full manicure. A practice tip or suitable disposable surface lets you see how much polish the brush releases. Do not assume that buying more tools will make a thick line thinner; the amount of polish and pressure still matter.
This method is for ordinary air-drying polish. Gel products use a different system, and a product name containing “gel-like” does not by itself tell you how it sets. Read the label. Use lamp-cured products only according to their own system instructions, or have a nail professional perform that service.
How to Do a Micro French Manicure: Eight Beginner Steps
Step 1: Settle on a Comfortable Short Shape
Remove old polish and inspect the free edges. File to the short shape you want, making the outline reasonably consistent across the hand. Avoid repeatedly shortening every nail to chase tiny differences. The goal is a usable shape with an edge you can follow.
Before applying color, check whether your chosen design fits. If a nail has almost no visible free edge, plan a very small surface accent or leave that nail with the base color. A small adjustment is better than forcing a thick band onto limited space.
Step 2: Follow Your Polish System’s Preparation
Prepare the nail surface as directed by the products you are using, then apply the recommended base coat if the system calls for one. Keep layers controlled and allow the stated drying time. Work on a stable surface so you can rest your hands instead of holding them in the air.
Lay out the tip color and brush before you begin. Searching for a tool halfway through a wet manicure is an easy way to smudge the base or pick up unwanted lint.
Step 3: Apply Your Sheer or Nude Base
Apply a thin, even layer of the base color and assess the coverage. Add another layer only if you want more coverage and the product instructions allow it. Let the base dry sufficiently before drawing the edge; a moving or tacky base can make a fine line harder to control.
Check all fingers together. Decide whether you like the amount of natural nail showing now, because adding more base color after painting the tips may soften or cover the detail.
Step 4: Load Less Tip Polish Than You Think
Place a small amount of tip polish on the palette. Lightly load the liner brush, then test a short stroke. You want enough color to draw a clear line without a rounded bead hanging from the bristles.
If the practice stroke starts with a blob, remove some polish before touching your nail. If the brush drags or leaves almost no color, reload a little. Use the test surface to find a workable amount rather than making repeated corrections on the manicure itself.
Step 5: Build the Tip in Short Sections
Rest both hands on the table. Begin near one corner of the free edge and draw a short section toward the center, then complete the other side. Join the sections with a light touch. You do not need to finish the entire curve in a single sweeping motion.
Let the line follow the shape of the nail. On a square nail, the center may be fairly level; on an oval, it forms a broader arc. Keep the tip color on the nail surface and avoid dragging the brush onto the surrounding skin.
Step 6: Compare Before You Correct
Look at the nail from directly above, then compare it with the neighboring finger. Ask whether the line feels fine and balanced, rather than whether it is perfectly identical under magnification. A slightly wider thumbnail may need a slightly different curve to create the same overall effect.
If one section is clearly missing, fill only that gap. Repainting the entire line each time you spot an imperfection can quickly turn a micro tip into a conventional French band.
Step 7: Make Small Corrections or Restart One Nail
If polish reaches the skin, clean it according to the product directions. Remember that remover can also disturb the base color, so it is not always a precise eraser for the painted tip. If the line has become much too thick, removing and repainting that nail may give a cleaner result.
Practice the difficult movement once on the palette before restarting. Changing one thing—less polish, a steadier hand position or a shorter stroke—is more useful than repeating the same approach with more product.
Step 8: Finish and Allow Proper Drying Time
Once the design is ready for finishing, apply a compatible top coat according to its instructions. Avoid repeatedly brushing over the fine tip if doing so moves the color. Let the manicure dry thoroughly before tasks likely to press against or dent it.
There is no single drying time that applies to every combination of polish and top coat. Follow the labels, and give your first attempt enough time that you are not forced to rush the last stage.
Common Micro French Problems and What to Change
| Problem | What may be happening | A practical adjustment |
|---|---|---|
| The tip keeps getting thicker | Each correction covers the whole line. | Fill only a small gap, or restart that nail instead of adding another full band. |
| There is a blob at the corner | The brush releases too much polish at first contact. | Test the load on a palette and begin with a smaller amount. |
| The pale tip looks patchy | The chosen color needs another thin pass. | Follow its layering instructions and stay within the same narrow boundary. |
| The curve looks crooked | You may be viewing the nail at an angle while painting. | Check from above and support both hands on the table. |
| The base looks streaky | The layer may be uneven or not ready for another pass. | Correct the base before drawing the tip and follow the drying directions. |
| The top coat smears the line | The color may not be ready or the products may not work well together. | Check the instructions and test the combination on a practice tip. |
If your non-dominant hand struggles, simplify the task. Use one tip color, avoid adding a second outline, and work in short sections. An acceptable first manicure does not need to match an enlarged concept illustration. Aim for a clean overall impression at normal viewing distance.
If you prefer guides or decals, use products intended for nail art and follow their application and removal instructions. Adhesive placed over a base that is not ready can disturb it. Different guides create different curve widths, so check that the chosen one actually leaves a micro-sized band.
What to Ask for at a Salon
Describe the length, base, tip color and thickness separately. “French manicure” alone leaves room for a wider white tip than the one you have in mind. Show a concept image, then explain which part of it matters most to you.
Confirm the price and service type before the manicure starts. If you prefer regular polish, say so. If you are considering gel or another system, ask the technician to explain what they recommend for your requested finish. A design reference is not a specification for the products used.
Keep the Design Looking Intentional as It Wears
Follow the care and removal instructions for your manicure system. Do not assume a fine tip will last a fixed number of days or that a sheer base makes it maintenance-free. Small chips can interrupt a narrow line, especially in a contrasting color.
With ordinary polish, a small touch-up may be possible, but repeated repairs can make the edge uneven. Decide whether a fresh coat on one nail would look cleaner. Keep the same color available if you plan to touch up, and avoid layering unrelated products over a salon system without asking how they interact.
Frequently Asked Questions
Can you have a micro French manicure on very short nails?
Often, yes, provided there is enough accessible nail surface to place the accent neatly. Keep the line fine and adapt it to the actual shape. If the edge is extremely short, a small dot or side accent may be easier than a complete French curve.
How thin should the tip be?
There is no universal width for every nail. Aim for a slender band that leaves most of the base visible. Judge the result on the whole hand rather than measuring every finger identically. The tip can vary slightly while still looking consistent.
Do I need gel polish?
No. A micro French is a design, not a requirement to use one product system. It can be interpreted with ordinary polish or professionally applied systems. The tutorial above uses air-drying polish; lamp-cured products require their own application instructions.
Can I do it without a liner brush?
A small polish brush may work if you can control the amount of color at its edge. Test it on a practice surface. A fine liner brush can make a narrow line easier to place, but it does not remove the need for a light load and a steady hand position.
Should I choose a clear, sheer pink or nude base?
Choose according to how much natural nail you want visible and the contrast you like. Clear-looking and sheer bases show more of the nail beneath; a more opaque nude provides more coverage. Test one nail before committing to the whole manicure.
Does a micro French make nails grow or become stronger?
This guide uses the term to describe an appearance. A thin painted tip does not establish a nail-growth or strengthening benefit. Choose it because you like the design, and assess any separate product claims on their own evidence.
Is this the same as a baby boomer manicure?
In common salon usage, a baby boomer manicure refers to a blended pink-to-white or nude-to-white gradient. The micro French discussed here has a distinct thin line at the edge. Terminology can vary, so bring a picture and explain whether you want a clear boundary or a blended transition.
Are the examples real manicure photographs?
No. Both boards are AI-created concept illustrations. They show six palette options and the intended placement of a fine edge. A real result will vary with your nail shape, chosen products and technique; no product testing or salon work is being claimed.
For your first attempt, choose one base and one tip color. Practice a few short lines, then focus on keeping the edge delicate rather than adding more detail. Once that feels manageable, change the color or shape of the curve one choice at a time.
Technique reference: Essie’s French manicure guide. The six design choices, planning suggestions and troubleshooting notes are editorial guidance, not a claim of first-hand product testing.