NAILCASA · SHORT NAIL INSPIRATION
12 Short Brown French Tip Nail Ideas: Chocolate, Mocha and Caramel
Compare warm and muted browns, choose a tip that fits your nail shape, and find one detail worth taking to your next appointment.
Short brown French tip nails combine a light or nude base with a brown edge. The design can be simple and glossy, softened with a muted mocha shade, or made more decorative with a small flower, cream outline or gold accent. You can keep your nails short while changing the color and shape of the tip.
The best starting point is not the most complicated picture. Decide how dark you want the brown to look, how much of the nail you want covered, and whether you prefer a plain edge or an accent. Those three choices will narrow down the designs much faster than comparing dozens of unrelated manicure photos.
This guide offers 12 distinct brown French manicure ideas, grouped into simple shades, graphic details and finish variations. Each includes a shape suggestion, a practical adjustment for short nails, and a request you can use at a salon. The suggestions describe the look, not a particular product or a tested wear result.
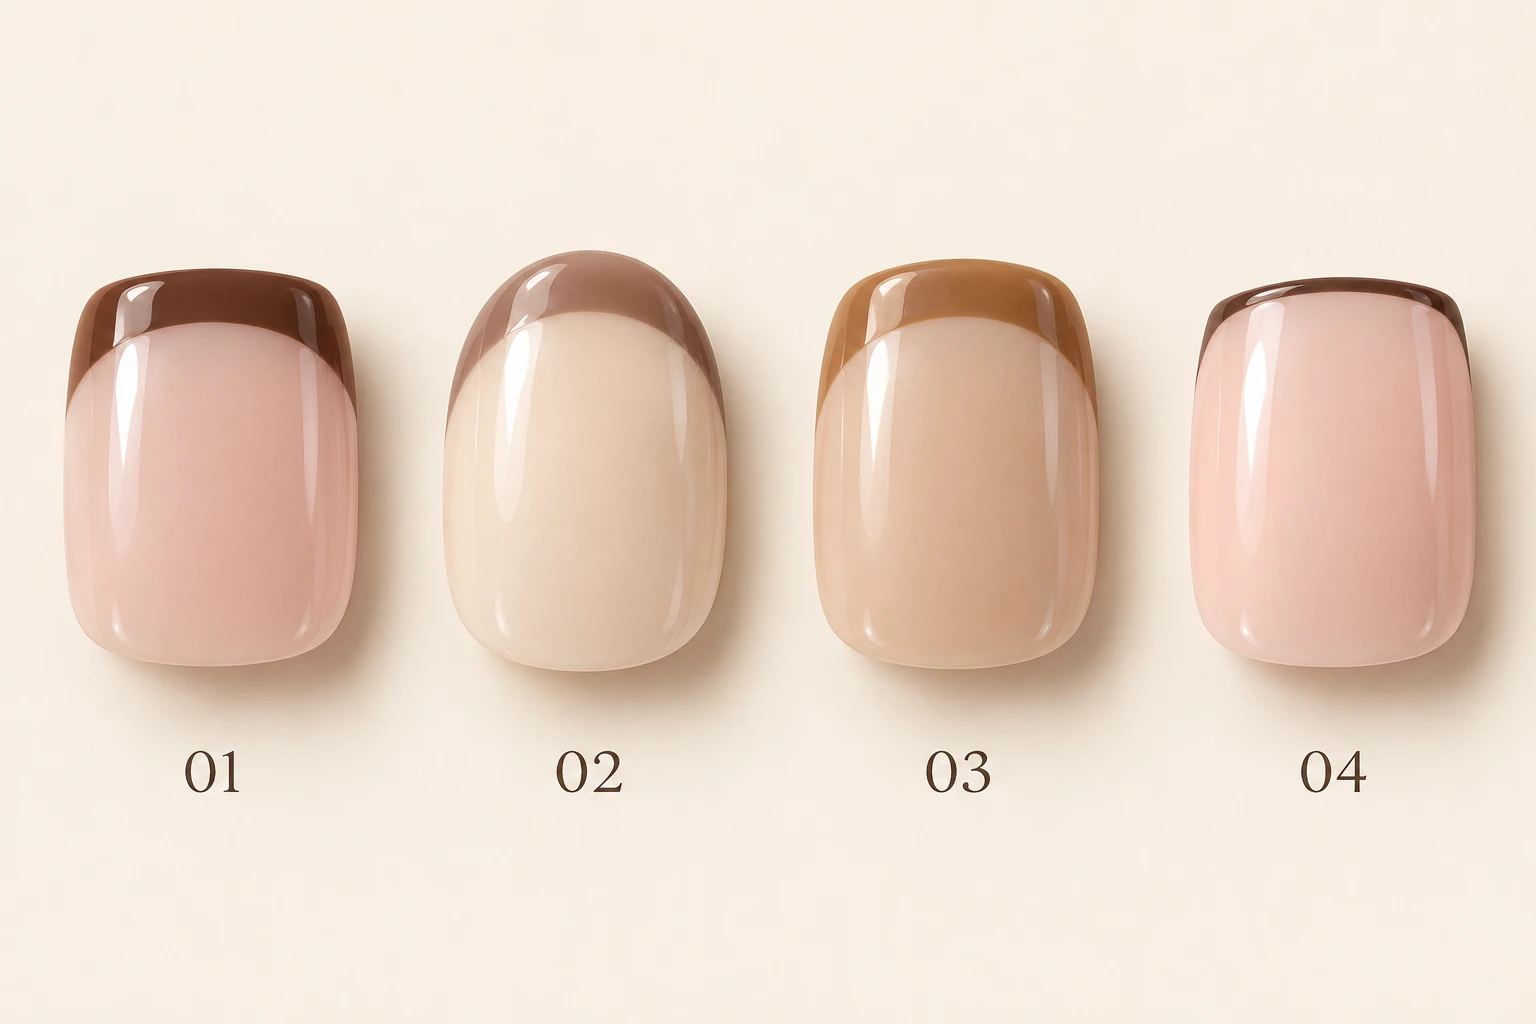
About the images: These are three original AI-created concept boards showing 12 design ideas. They are not photographs of real salon work. Colors, line widths and decorative details should be adapted to your actual nails and the products used.
Chocolate, Mocha, Caramel or Espresso: What Is the Difference?
These shade names are useful descriptions, but they are not standardized across polish brands. One brand’s mocha may look pinker or grayer than another’s. Use the names to describe a direction, then compare a real swatch with the base color you plan to wear.
| Shade direction | The look used in this guide | Base to compare it with |
|---|---|---|
| Chocolate | A rich, medium-to-deep brown with a clear outline | Sheer pink or a light neutral nude |
| Mocha | A softer, more muted brown | Ivory nude or a lightly pink base |
| Caramel | A warmer golden-brown accent | Sheer beige or peach-leaning nude |
| Espresso | A very dark brown that may look nearly black indoors | A sheer base that leaves the edge easy to see |
| Taupe brown | A muted brown with a grayish character | Rosy nude or a neutral base |
There is no rule that assigns one brown to one skin tone. Hold the swatch beside your hand and judge the contrast you prefer. A warm caramel can feel lively against one base and blend into another; a darker espresso can be subtle as a fine line but much bolder as a broad tip.
Check the pairing in daylight and indoors. If you want the brown to remain obviously brown, avoid choosing only from a dimly lit photograph. The base matters too: an opaque cream changes the whole manicure more than a nearly transparent pink does.
Ideas 1–4: Simple Brown French Tips

1. Glossy Chocolate Tips on a Sheer Pink Base
This is the most direct interpretation of short brown French tip nails: a clearly defined chocolate edge over a light pink base. The two-color design leaves the outline and finish to do the work. It is a good starting point if you want a brown manicure without extra artwork.
On a short square nail, keep the center of the tip fairly shallow and let the corners curve naturally. If the brown starts to cover too much of the nail, reduce the band rather than adding decorations to balance it. Check the proportions before committing to every finger.
Shape to try: Short square or squoval. DIY difficulty: Intermediate.
Salon request: “A sheer pink base with glossy chocolate French tips, kept shallow enough for my short nails.”
2. Muted Mocha Tips with an Ivory Nude Base
A mocha-and-ivory pairing gives a softer contrast than dark chocolate on pink. Choose it when you want a defined French edge that remains understated. The key is keeping enough difference between the two shades that the tip does not disappear.
Try the pairing on one nail or a practice tip first. If the mocha looks almost the same as the base, change one of the colors rather than immediately making the band deeper. A short oval shape supports a gentle arc, but the same palette can work on a squoval outline.
Shape to try: Short oval. DIY difficulty: Intermediate.
Salon request: “Muted mocha tips over an ivory nude base, with a soft curved border.”
3. Warm Caramel French Tips
Caramel brings a golden-brown direction to the design. It can be a useful alternative when deep brown feels too dark but you still want more color than a cream French tip. Use a nude base with enough contrast to keep the caramel visible.
The warmth of the base can change the result noticeably. A peachy nude creates a warmer combination, while a more neutral base makes the golden edge stand out differently. There is no need to match every outfit to the manicure; choose the pairing you enjoy looking at on your own hand.
Shape to try: Short squoval. DIY difficulty: Intermediate.
Salon request: “A light nude base with warm caramel tips, avoiding an orange-looking shade.”
4. Fine Espresso Micro Tips
This version reduces the very dark brown to a fine line at the free edge. It gives you an espresso accent while preserving most of the sheer base. Compared with the other simple designs, the smaller tip is the defining feature.
Because the shade is dark, a tiny change in line thickness can be noticeable. Start finer than you think you need, then inspect the whole nail before adding more. If your nails have almost no visible free edge, a small brown dot may be easier to place than a complete curve.
Shape to try: Short square or squoval. DIY difficulty: Intermediate to advanced precision.
Salon request: “A very thin espresso micro-French tip over a sheer base, with no thick band.”
Ideas 5–8: Graphic Lines and Small Artwork

5. Diagonal Chocolate Tips
A diagonal tip moves away from the usual symmetrical curve. Chocolate brown crosses the upper corner of the nail while the rest remains nude. The angle makes the design feel graphic without introducing a second accent color.
Decide whether all diagonals should face the same direction or mirror each other across the hands. Keep the depth reasonably consistent so one nail does not look almost fully brown while another has only a tiny corner. For the shortest nails, make the diagonal shallower than the enlarged reference suggests.
Shape to try: Short oval or squoval. DIY difficulty: Intermediate.
Salon request: “Nude nails with shallow diagonal chocolate tips, using a coordinated angle across the set.”
6. Brown Tips with a Fine Cream Border
A narrow cream line underneath the brown tip separates it from the nude base. The extra line makes the border more decorative, so the rest of the nail can stay plain. It is especially useful when you want a small graphic detail without a flower or other motif.
The two lines still need to fit within a short nail. Keep the cream border much finer than the brown section, and avoid increasing both widths to correct a small irregularity. If the nail feels crowded, use the cream border on one or two accent nails only.
Shape to try: Short squoval. DIY difficulty: Advanced precision.
Salon request: “Chocolate French tips with a hairline cream border beneath them, keeping plenty of nude base visible.”
7. Chocolate-and-Caramel Split Tips
Split the French tip into two neighboring shades: chocolate on one side and caramel on the other. The nude base remains the same, so the variation is contained within the colored edge. The contrast works best when the two browns are clearly different.
Keep the join between the shades simple. A small vertical division is enough; adding a zigzag or third color can make the tip difficult to read at short length. You can repeat the split on every nail or use it as an accent beside single-color brown tips.
Shape to try: Short square. DIY difficulty: Advanced precision.
Salon request: “A shallow French tip divided into chocolate and caramel, with a clean join and a nude base.”
8. Brown French Tips with a Tiny White Daisy
A small white daisy gives the manicure a softer decorative element. Position it near one corner of an accent nail, allowing the flower to overlap the brown border slightly. Keep the remaining nails simple so the flower has a clear role in the set.
A flat painted flower or suitable nail decal is an approachable interpretation. The concept illustration shows the placement, not a requirement to add a raised decoration. Choose a motif small enough to leave open space; a flower covering most of the nail becomes a different design.
Shape to try: Short oval or squoval. DIY difficulty: Intermediate with a decal; more detailed freehand.
Salon request: “Brown French tips with one tiny, flat white daisy on an accent nail.”
Ideas 9–12: Gold, Matte and Understated Accents

9. Chocolate Tips with a Fine Gold Outline
A thin gold line beneath the chocolate tip introduces a reflective detail. Keep it narrow and let the brown remain the main color. This is an option for a more dressed-up manicure without needing large gems or several layers of artwork.
Explain the finish you want: gold nail polish, foil and chrome effects are not interchangeable. A painted metallic line can interpret the idea without reproducing every reflection in the concept board. On very short nails, choose one outlined accent rather than widening the border across the whole set.
Shape to try: Short oval. DIY difficulty: Advanced precision.
Salon request: “Chocolate French tips with a delicate gold line just below the brown; keep the design flat.”
10. Matte Nude with Matte Brown Tips
Changing the whole manicure to a matte finish creates a different look without adding another color. The boundary between nude and brown remains the main detail. Because the shine is removed, inspect the pairing as a matte sample rather than deciding only from glossy bottle swatches.
Keep both the base and tip matte for the version shown here. If you want a glossy tip against a matte base, describe that separately; a final glossy coat over the entire nail would create another result. Follow the finishing product’s instructions rather than assuming every top coat behaves the same way.
Shape to try: Short square or squoval. DIY difficulty: Intermediate.
Salon request: “A matte nude base with matte chocolate tips, with no glossy top finish.”
11. Brown French Tips with One Small Dot
A single brown dot near the lower part of the nail echoes the tip color. It is a small addition, but the repeated shade ties the two ends of the design together. Leave a clear gap between the dot and the skin, and keep plenty of nude space around it.
You can place the dot on every nail or use it on one accent. Test its size on a practice surface first; a large blob changes the balance of a short manicure quickly. The dot should feel like a detail rather than a second major section of color.
Shape to try: Short squoval. DIY difficulty: Intermediate overall; the dot is beginner-friendly.
Salon request: “Brown French tips with a single tiny matching dot on the nude base of each accent nail.”
12. Taupe Brown Tips on a Rosy Base
A muted taupe tip offers a different direction from the warmer chocolate and caramel examples. Pair it with a rosy nude base to create a soft contrast. Check the colors together rather than assuming all gray-brown shades will work the same way.
This is a useful design when you want the shape of a French manicure without a particularly dark edge. If the colors blend too closely, choose a slightly deeper taupe. Keep the base shade you like rather than changing several parts of the design at once.
Shape to try: Short oval. DIY difficulty: Intermediate.
Salon request: “A rosy nude base with muted taupe-brown French tips and a soft, curved border.”
Which Brown French Design Should You Choose?
Choose the detail you want to notice first. If it is the brown shade itself, start with chocolate, mocha, caramel or taupe. If it is the line, consider the diagonal, split or outlined versions. If it is a motif, keep the flower or dot small and simplify the other nails.
| Your priority | Start with | Adjustment for short nails |
|---|---|---|
| A straightforward first brown French | Glossy chocolate or muted mocha | Use a shallow tip and one consistent base. |
| A darker color with minimal coverage | Fine espresso micro tips | Keep the line delicate rather than increasing the band depth. |
| A small occasion detail | Gold outline or a tiny daisy | Use one or two accent nails. |
| A graphic design | Diagonal or split tips | Choose a clear direction and leave the rest of the nail plain. |
| A quieter finish | Matte brown or taupe over rosy nude | Compare the actual finish and shade before committing. |
Your shape affects the border. A square nail can support a relatively level center with curved corners, while an oval needs a rounded arc. Avoid choosing a deep smile line only because it looked attractive on a long reference nail. Adapt the amount of color to the surface you actually have.
A Practical Approach with Regular Nail Polish
For a first attempt, choose one of the simple two-color designs. You will need your usual shaping tools, the selected nude and brown polishes, a fine nail-art brush if needed, and compatible base and top coats. This approach is for air-drying polish; gel and other systems require their own product instructions.
- Prepare and shape. Remove old polish and choose a comfortable short outline. Follow your polish system’s preparation directions.
- Apply the base color. Use thin layers and the drying time specified by the product. Decide whether you like the coverage before painting the tip.
- Test the brown. Make a small swatch next to the base color. Practice a curved line on a suitable surface to check the brush load.
- Paint a shallow tip. Work in controlled sections and follow the nail’s outline. Start with less depth; inspect before adding more color.
- Keep corrections local. Fill a small gap rather than repainting the entire band. If it becomes much too thick, restarting that nail may be cleaner than adding more layers.
- Finish as directed. Apply a compatible finishing coat when the design is ready, then allow the manicure to dry thoroughly.
For a manufacturer example of the general French manicure sequence, see Essie’s French tip guide. The decorative ideas here are optional additions. Try the plain brown tip first before attempting a second outline or a split-color edge.
Common Mistakes with Short Brown French Tips
The tip covers more of the nail than intended
Keep more of the base visible and reduce the depth of the brown band. Do this before adding a flower, dot or outline. A decorative accent will not solve a proportion you already dislike.
The brown looks black or orange
Check a swatch in different light. Choose a visibly warmer or lighter brown if espresso looks too dark, or a more muted brown if caramel looks too orange for your taste. Change one shade at a time so you can see what improves the pairing.
The base and tip blend into one color
Increase the contrast between them. A slightly deeper brown or lighter base may define the edge more effectively than a thicker line. Test the combination on one nail before applying it to the full set.
Too many accents compete
Select one decorative idea: a flower, a metallic line, a split tip or a dot. Repeat the same palette on the other nails. If every nail has several different details, the brown French outline can become difficult to appreciate.
The inspiration board becomes an exact-size template
The illustrations are enlarged concepts, not measurements. Ask your nail artist to scale the band and motif to your nails. If a design needs more room than you have, simplify it or use it on just one larger accent nail.
A Clear Brief for Your Nail Artist
Bring one main reference and one simpler backup. State the length you want to keep, the shape, the base coverage and the finish. Also specify whether you want flat artwork or raised decoration, since the same image may be interpreted in different ways.
The design does not determine the product system automatically. Tell the artist if you prefer regular polish or are considering another service. Confirm the application, expected maintenance and removal before the appointment begins.
Frequently Asked Questions
Do brown French tips work on short nails?
They can. Keep the band proportionate to the nail, choose a base that separates clearly from the brown, and adapt the curve to the shape. If there is almost no free edge, a smaller accent may be easier to place than a full tip.
Which brown French design is easiest to try first?
A plain chocolate or mocha tip uses fewer steps than an outlined or split-color design. French borders still take some control, so practice a short curve before painting the full manicure. Add decorative details only once you are happy with the basic line.
Can I use regular nail polish instead of gel?
Yes, the flat painted ideas can be interpreted with regular polish. Use products that work together and follow their instructions. Metallic effects, decals and other additions have their own requirements; do not assume a gel technique transfers directly to air-drying polish.
What nude base goes with brown tips?
Try sheer pink, neutral beige, ivory nude or rosy nude, then compare the actual swatches. Choose according to the coverage and contrast you prefer. The word “nude” on a bottle does not identify one universal shade.
Are brown French nails only for autumn?
No. You can wear the palette whenever you like. A light base with caramel or mocha creates a different impression from dark espresso or gold-outlined chocolate, so choose the combination for your preference rather than treating a season as a restriction.
Should every nail have an accent?
It does not need one. A flower, dot or metallic border on one or two nails can provide enough variation. Keep the remaining nails consistent if you want the accent to be easy to notice.
How long will the manicure last?
The color alone does not determine wear time. Products, preparation, application and everyday use all matter. Follow the care and removal directions for the manicure system rather than relying on a general number of days for brown French tips.
Are the pictures real examples of completed salon work?
No. They are original AI-created concept illustrations for this guide. They show design choices and color pairings, not verified salon results or product tests. Adapt them with your nail artist rather than expecting an exact reproduction.
Pick one brown, one base and one finish to begin. If the simple pairing works on your hand, you can keep it as it is or add one small detail. That gives you a clear plan for a home attempt or a useful reference for your next appointment.
Further reading: Essie’s French manicure guide and Semilac’s chocolate French overview. These are manufacturer resources, not independent product reviews. Design selections and commentary are original editorial suggestions.