NAILCASA · NAIL DESIGN GUIDE
15 Short Burgundy Nail Designs for Square and Oval Nails
A practical guide to wine-colored manicures, from an understated glossy finish to small accents that leave short nails room to breathe.
Short burgundy nail designs can be as simple as a glossy wine-colored manicure or as detailed as a tiny floral accent. The most useful starting point is the amount of space on your nail: choose a thin tip, a small motif or a restrained contrast when a larger pattern would cover the whole surface.
This guide includes 15 design ideas, suggestions for square and oval shapes, and short phrases you can take to a nail appointment. There are also three beginner-friendly approaches using regular nail polish. You do not need long extensions to explore the palette, and you do not need to combine every idea in one manicure.
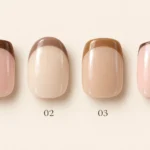
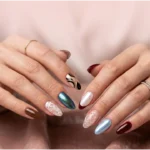
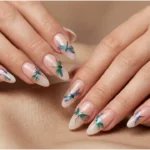
About the visuals: The numbered boards are original AI-created design concepts, not photographs of salon work or product tests. Use them to discuss color and placement; the result on your nails will depend on your nail shape, chosen products and application.
How to Choose a Burgundy Shade and Nail Shape
Burgundy is a useful description for a wine-red color family, but bottles with that label can look noticeably different. Some lean brown, some look closer to berry, and others become almost black in dim light. Compare a swatch in daylight with one indoors before deciding how dark you want to go.
For a softer contrast, choose a sheer berry finish or combine burgundy with a nude base you enjoy wearing. For a more defined result, choose an opaque wine shade. There is no single burgundy reserved for a particular skin tone; compare the overall effect on your own hand rather than treating a color chart as a rule.
| Your shape | A useful starting design | Placement to watch |
|---|---|---|
| Short square | Glossy color, micro-French tips or a single dot | Keep a tip narrow enough to leave visible base color. |
| Short oval | Fine gold edging, diagonal tips or a small heart | Let the detail follow the rounded outline. |
| Short squoval | Half moons, cream waves or matte-and-gloss contrast | Leave space around the accent and soften the corners. |
| Very little free edge | Solid color, one dot or a small flower | Use the nail surface rather than forcing a wide French tip. |
These are design suggestions, not restrictions. If your nails have different amounts of free edge, keep the overall impression consistent rather than forcing identical tip widths. A smaller accent on a smaller nail often looks more intentional than squeezing in the same full-size pattern everywhere.
Designs 1–5: Simple Burgundy Color and Tips

1. Classic Glossy Wine Nails
A plain wine-colored manicure is the clearest way to make the shade itself the focus. Keep the shape neat and consistent, then let the gloss provide the detail. This is a useful choice when you want a design that does not compete with patterned clothing or statement jewelry.
On short square nails, the straight edge gives the dark color a crisp outline. On oval nails, the same shade reads softer. Choose a wine red that remains visibly red in the lighting where you will usually wear it if an almost-black result is not what you want.
Best fit: Square, oval or squoval. Difficulty: Beginner with regular polish.
Ask your nail artist: “Short, evenly shaped nails with an opaque wine-red color and a glossy finish.”
2. Sheer Berry Burgundy
A sheer burgundy finish lets some of the nail show through instead of creating a solid block of dark color. It suits a lighter-looking manicure, especially when you prefer a berry tone to a brown-based wine. The board illustrates that translucent effect rather than a specific polish formula.
Use a product intended to give a sheer finish. Trying to make an opaque polish translucent with an uneven coat can leave streaks. Compare each nail after the same number of thin layers, following the product directions, and decide whether you prefer the lighter or deeper version.
Best fit: Short oval or squoval. Difficulty: Beginner to intermediate.
Ask your nail artist: “A translucent berry-burgundy finish with some natural nail still visible.”
3. Burgundy Micro-French Tips
A micro-French manicure uses a narrow band of color at the free edge. Pair a burgundy tip with a sheer pink, nude or clear-looking base. Keeping that line slender leaves most of the nail visible, which is especially helpful when there is limited space for a design.
Follow the nail’s outline rather than drawing a thick, flat stripe across every finger. If you have almost no free edge, a single dot or side accent may be easier to place neatly. You can also use the micro-French design on a few nails and solid burgundy on the others.
Best fit: Short square or squoval with a visible free edge. Difficulty: Intermediate.
Ask your nail artist: “A sheer base with very thin burgundy French tips, keeping the band delicate.”
4. Diagonal Burgundy Tips
A diagonal tip changes the direction of the classic French shape. The burgundy section crosses one corner instead of forming an even band. Keep the remaining nail nude so the diagonal remains easy to see. This works particularly well as one accent among simpler solid-color nails.
Choose the direction before painting. Matching the angle across the hand creates a coordinated look; alternating directions creates a more graphic one. Either approach can work, but avoid changing the size of the burgundy section so much that the manicure looks accidental.
Best fit: Short oval or squoval. Difficulty: Intermediate.
Ask your nail artist: “A nude base with a clean burgundy diagonal corner, leaving most of the nail light.”
5. Burgundy with a Nude Half Moon
For this design, a small nude crescent remains visible near the cuticle while burgundy covers the rest of the nail. The contrast adds detail without introducing another strong color. Keep the crescent shallow so there is still plenty of room for the wine shade.
The curved border needs to look deliberate. If painting a clean curve is frustrating, use a suitable nail-art guide according to its instructions or ask a nail artist to place it. Do not assume this design hides all regrowth; its appearance will still change as your nails grow.
Best fit: Short squoval or oval. Difficulty: Intermediate.
Ask your nail artist: “A small nude half moon near the cuticle with burgundy over the rest of the nail.”
Designs 6–10: Small Accents and Contrasting Finishes

6. Burgundy with a Fine Gold Edge
A narrow gold edge gives a plain burgundy manicure a little contrast without covering the main color. Place the metallic line along the free edge and keep the rest of the nail simple. It is a useful option for an occasion when you want a small detail that echoes gold jewelry.
Metallic polish is an approachable way to interpret the idea. It will not necessarily look identical to a foil or chrome finish, so describe the effect you want rather than treating those materials as interchangeable. Start with one or two accent nails if a full set feels too decorative.
Best fit: Short oval or square. Difficulty: Intermediate.
Ask your nail artist: “A burgundy base with a very fine gold line at the edge, without raised embellishments.”
7. A Single Burgundy Dot
One small dot on a nude base is an easy way to try the color without committing to a fully dark manicure. Place the dot near the cuticle, leaving a visible gap from the skin, or slightly above the center. Use the same placement on each nail for a calm, repeated pattern.
The size matters more than perfect mathematical alignment. A large blob can dominate a short nail, while a tiny dot leaves room around it. Test the amount of polish on a practice surface first. Pair the design with a few solid burgundy nails if you want more color.
Best fit: Any short shape. Difficulty: Beginner.
Ask your nail artist: “A sheer nude base with one tiny burgundy dot on each nail.”
8. A Tiny Burgundy Heart
A small heart gives a short manicure a playful detail while keeping the color scheme restrained. Choose one accent nail and leave the others plain or wine-colored. A nude base provides contrast, so the heart remains readable without needing a heavy outline.
For a simpler home version, choose a flat nail-art sticker instead of attempting a raised decoration. Check that it fits the available nail surface. If you prefer a hand-painted heart, practice a small version first; broad lobes and a long point can quickly take up more space than expected.
Best fit: Short oval or squoval. Difficulty: Beginner with a sticker; intermediate freehand.
Ask your nail artist: “One small burgundy heart on a nude accent nail, with no bulky decoration.”
9. A Cream Wave on Burgundy
A narrow cream wave breaks up a dark base without turning the whole manicure into a busy pattern. Place the wave near one side and let it bend gently from one end of the nail toward the other. The off-center position leaves a broad area of burgundy visible.
Use one accent nail if the wave is bold, or make each line finer for a repeated set. The contrast between cream and wine is already strong, so extra glitter or gems are optional rather than necessary. Slight variation between hand-painted curves can be part of the design.
Best fit: Short squoval or square. Difficulty: Intermediate.
Ask your nail artist: “A burgundy base with one slim cream wave down the side of an accent nail.”
10. Matte Burgundy with Glossy Tips
This design changes the finish while keeping the color consistent. A matte burgundy base sits beneath a glossy tip in the same shade. The difference becomes most visible as light moves across the nail, so it offers a quieter contrast than adding white or gold.
Explain both finishes at the appointment. A final coat of gloss over the entire nail would remove the intended matte contrast. For a home attempt, use compatible products and follow their instructions. Keep the glossy section modest so both surfaces remain visible on a short nail.
Best fit: Short square or squoval. Difficulty: Intermediate.
Ask your nail artist: “Matte burgundy nails with a narrow glossy French tip in the same color.”
Designs 11–15: Color Pairings, Shimmer and Artwork

11. Burgundy and Blush Pink
Combine solid burgundy nails with one or two blush-pink nails for a simple two-color manicure. The lighter shade changes the rhythm of the set without needing detailed artwork. The board shows the two colors together; you can decide how to distribute them across your fingers.
Try the colors side by side before painting the full set. A very peachy pink and a purple-leaning burgundy create a different contrast from a cool blush and deep wine. Keep the finish consistent across both colors if you want the pairing to feel particularly cohesive.
Best fit: Any short shape. Difficulty: Beginner.
Ask your nail artist: “Glossy burgundy nails with two blush-pink accents, without additional artwork.”
12. Fine Burgundy Shimmer
A finely shimmering burgundy polish gives the color movement without requiring a painted motif. Look for a subtle reflective effect if you want the result to remain mostly wine-colored from a distance. Larger glitter pieces create a different look and can visually crowd a small nail.
Check the finish under more than one light source. A shade that looks flat indoors may sparkle strongly near a window. You can use shimmer on one nail and matching cream burgundy on the rest, or keep the same finish across the whole manicure.
Best fit: Short square, oval or squoval. Difficulty: Beginner with a suitable polish.
Ask your nail artist: “A deep burgundy with fine shimmer, rather than chunky glitter or a magnetic pattern.”
13. An Off-Center Burgundy Stripe
A single slender stripe on a nude base offers a graphic alternative to a French tip. Place it slightly to one side rather than exactly in the center. The open space on either side is part of the effect, so keep the line narrow enough to read as an accent.
On a very short nail, stop before the stripe becomes a thick panel of color. A fine liner brush or suitable nail-art decal can help with the placement. Repeat it on every nail for a coordinated manicure, or use it beside solid burgundy nails.
Best fit: Short oval or square. Difficulty: Intermediate.
Ask your nail artist: “A sheer nude manicure with one thin, off-center burgundy stripe on each accent nail.”
14. A Small Burgundy Flower
A small five-petal flower introduces a decorative motif while keeping the palette limited. Use burgundy petals and a cream center on a nude background. Position the flower toward one corner so it looks intentionally placed rather than stretched to fill the entire nail.
The concept board shows a dimensional-looking flower, but a flat painted interpretation is more straightforward for everyday wear. Discuss which version you want before the appointment. For a beginner home option, choose a small flat floral decal and follow its application instructions.
Best fit: Short square or squoval. Difficulty: Beginner with a decal; intermediate freehand.
Ask your nail artist: “One small burgundy flower with a cream center on a nude accent nail; keep the artwork flat.”
15. Burgundy with Sparse Gold Foil
A few small gold flecks can make a dark manicure feel more decorative without covering it in glitter. Group the pieces near one corner of a single accent nail. Leave plenty of plain burgundy around the cluster so each fleck remains visible.
Use nail-art foil compatible with the chosen manicure system rather than household craft materials. The exact application depends on the product, so follow its directions or have a nail artist place it. Adding more pieces is easy; keeping the accent restrained is what gives this version its character.
Best fit: Short oval or squoval. Difficulty: Intermediate; product-dependent.
Ask your nail artist: “Glossy burgundy with a small cluster of gold foil on one accent nail.”
Three Beginner-Friendly Ways to Try the Look
The methods below use ordinary air-drying nail polish. They are design instructions rather than a product test, and drying times depend on the formulas you choose. If a product requires a lamp or a separate bonding system, follow that manufacturer’s instructions instead of treating it like regular polish.
Method 1: A Simple Glossy Burgundy Manicure
- Start with a clean surface. Remove old polish and shape the free edge to a comfortable length. Follow your polish system’s preparation directions.
- Apply the recommended base coat. Use a thin, even layer if the system calls for one. Allow it to dry as directed.
- Add thin color layers. Begin with a modest amount of burgundy on the brush. Keep it on the nail surface and avoid flooding the surrounding skin. Allow the recommended drying time between layers.
- Check the coverage. Look at the nails in good light. Add another thin layer only if needed and permitted by the product instructions.
- Finish with a compatible top coat. Let the manicure dry thoroughly before activities likely to dent the surface.
Essie’s at-home manicure guide provides a manufacturer example of preparation and layering. Adapt the sequence to your own products rather than assuming every polish system uses identical steps.
Method 2: A Nude Base with One Burgundy Dot
Apply your chosen nude base and let it dry. Place a small amount of burgundy polish on a disposable palette. Lightly touch a clean dotting tool into it, practice one dot on the palette, then place a single dot on the nail. Keep it away from the skin and leave empty space around it.
Let the dot dry before finishing with a compatible top coat. If it spreads into a large blob, use less polish on the next attempt. Practice the size first instead of repeatedly adding product to an already wet dot.
Method 3: A Burgundy-and-Blush Color Pairing
Choose which nails will be burgundy and which will be blush before you start. Paint each color as a complete manicure layer rather than trying to paint both shades onto the same nail. This gives you a coordinated design without needing a fine brush or a stencil.
Compare the finish of the two polishes. A glossy wine shade beside a chalky matte pink may look different from the polished pairing you had in mind. Use compatible finishing products and let each coat dry according to its directions.
Common Mistakes with Short Burgundy Nails
A French tip takes over the whole nail
Reduce the width of the colored band and preserve more of the nude base. If there is too little room for the tip you want, choose the dot, stripe or solid-color design instead. A short nail does not need a French tip to look finished.
The shade looks almost black
Compare the color in daylight before applying the full manicure. Choose a redder wine or berry shade if you want the burgundy tone to remain obvious. More layers can deepen some formulas, so assess the color at the coverage level you plan to wear.
Every nail has a different competing detail
Choose one main accent and repeat its palette. For example, combine plain burgundy, one nude heart and one blush nail. Adding foil, flowers, waves and contrasting finishes to the same short set can make each individual idea harder to appreciate.
The artwork smears under the top coat
Check the drying and compatibility instructions for both the art product and finishing coat. Avoid repeatedly dragging the brush across partly dry detail. If you are trying a new combination, test it on a practice tip before committing to the full manicure.
The inspiration image is treated as an exact result
Use the boards to explain a palette and placement, then adapt the design to your actual nails. A short, broad nail and a narrow oval will not hold the same artwork in identical proportions. Show the reference to your nail artist and agree on what will change.
What to Take to Your Nail Appointment
Choose one main design and one simpler alternative. Tell your nail artist the length you want to keep, whether you prefer a flat finish or added texture, and whether you want regular polish or another service. Ask about the method, price and removal before the work begins rather than assuming those details from a reference image.
A useful request is: “I want to keep my nails short and oval. I like this burgundy shade with one cream-wave accent. Please keep the design flat, and let me know which service would create it.” That gives the artist a clear brief while leaving room to adapt the artwork.
Frequently Asked Questions
Does burgundy look good on short nails?
Burgundy is easy to adapt to short nails because the color can stand on its own. A glossy finish, narrow French tip or single small accent gives you different options without needing much surface area. The shade and amount of contrast are matters of personal preference.
Which design is easiest for a beginner?
Start with glossy solid color, a burgundy-and-blush pairing or a single dot on a nude base. These avoid the narrow curves and straight edges required by French tips and striped designs. Practice the dot size before putting it on your nail.
Can I create these designs with regular nail polish?
Many of the flat-color and painted ideas can be interpreted with regular polish, including dots, stripes, hearts and waves. Foil and other special effects need compatible products. Check the instructions rather than assuming a gel tutorial and an air-drying polish method are interchangeable.
Do I need extensions for short burgundy French tips?
Not necessarily. A thin colored tip can work with a small visible free edge, depending on the nail shape and the result you want. If there is almost no space at the edge, a side accent or dot may be more practical than forcing a wide French design.
Are square or oval nails better for burgundy?
Neither is automatically better. A short square shape gives solid color a crisp frame; an oval gives it a rounded outline. Choose the shape you prefer and adjust the design to it. The table near the beginning offers starting points for both.
What colors can I pair with burgundy?
For the ideas in this guide, try nude, blush pink, cream or a small metallic gold accent. Choose one supporting color first. Testing two swatches together is more useful than assuming every shade with the same color name will match.
How long will a burgundy manicure last?
There is no fixed wear time for the color itself. The product system, preparation, application and everyday use all affect the result. Follow the product’s care and removal instructions, and treat any brand wear claim as specific to that system rather than every burgundy manicure.
Are the pictures photographs of finished manicures?
No. The three boards are AI-created concept illustrations commissioned for this guide. They show color combinations and placement ideas, not verified salon results. A nail artist can help translate a concept into a design suited to your nails.
Choose One Detail to Start With
For the simplest first attempt, choose glossy wine or a burgundy-and-blush pairing. For a small accent, try a dot or a flat heart sticker. If you want a more detailed salon design, take the micro-French, gold-edge or cream-wave concept to your appointment. A clear color choice and one well-placed detail are enough to give short nails a complete design.
Technique references: Essie’s at-home manicure guide and French manicure guide. Design selections and commentary are original editorial suggestions; no product wear tests or salon credentials are claimed.